The weld-in-place PVC membrane liner helps pool professionals looking for solutions that allow them to build and renovate the most pools possible, with the ability to control their construction schedules.
Rather than dealing with long lead times for pre-manufactured products, weld-in-place membrane materials are readily available. Installers can overcome lead times by stocking material for upcoming jobs.
Weld-in-place liners are uniquely able to provide a perfect fit for custom pools because they are installed on-site, even for the most challenging shapes, so you get an exact fit. The 60- and 80-mil mesh reinforced PVC (polyvinyl chloride) adds to the longevity.
The membrane completely seals the structure of the pool and keeps it watertight, making it suitable for both renovating existing pools and building new pools. They can be used to finish off a new concrete wall or stainless-steel pool wall construction, or covering a cracked, peeling or leaking gunite or fiberglass pool.
To take advantage of the benefits this technology has to offer, contractors should start with a basic understanding of its installation.
Training crews
To help insure proper training, some membrane suppliers offer classes or assist with installations as the contractor learns the ropes.
Because it involves a relatively simple process, this type of installation is generally fairly quick. The welding of the pool walls and floor are the easiest to learn, while the more intricate parts, such as stairs and corners, are more complicated. As such, these intricate parts tend to be the focus of most installation training.
Understanding PVC membrane installation
The installation process of a PVC membrane is really quite straightforward.
Before setting the membrane, installers must clean and repair the surface of the pool. For most pools, this preparation takes a day or less.
After preparing the pool surface, contractors adhere a felt lining along the floor and walls. The felt performs the same function as a pad under a rug — it protects the surface before the PVC liner is installed and later gives it a soft, slightly cushioned feel. Many felts are made of fungicide-treated fibers that prevent the proliferation of bacteria behind the membrane.
After the felt lining is installed, 6-foot-wide strips of PVC membrane are rolled out and heat-welded together on site to ensure a smooth fit. Features such as steps, beach entries and safety ledges are also cut, fitted and welded.
Welding techniques
There are essentially three welding techniques used in different parts of the installation process to obtain the most water-tight and aesthetically pleasing pool membrane installation.
The two basic techniques — spot welding and traditional overlap welding — are used by all contractors and achieve a water-tight liner. Installers looking for a superior aesthetic also use the “butt-welding” technique along the pool floor to make the welds virtually invisible.
Spot welding: This technique is used at the beginning of installation to help position and secure the membrane, so it doesn’t move through the rest of the process.
Here, small, quick “pre-welds” are made between the overlapping membrane layers at intervals of approximately 7 to 8 inches down the seam. We take this step because the welded area can be detached if, during initial positioning of the material, the installer realizes the layers are not aligned.
The pieces must be perfectly aligned at this stage, and installers make sure the membrane does not move during this operation.
Overlap welding: The membrane layers should overlap by approximately 2 inches. This overlap will ultimately turn into a 2-inch-wide seam.
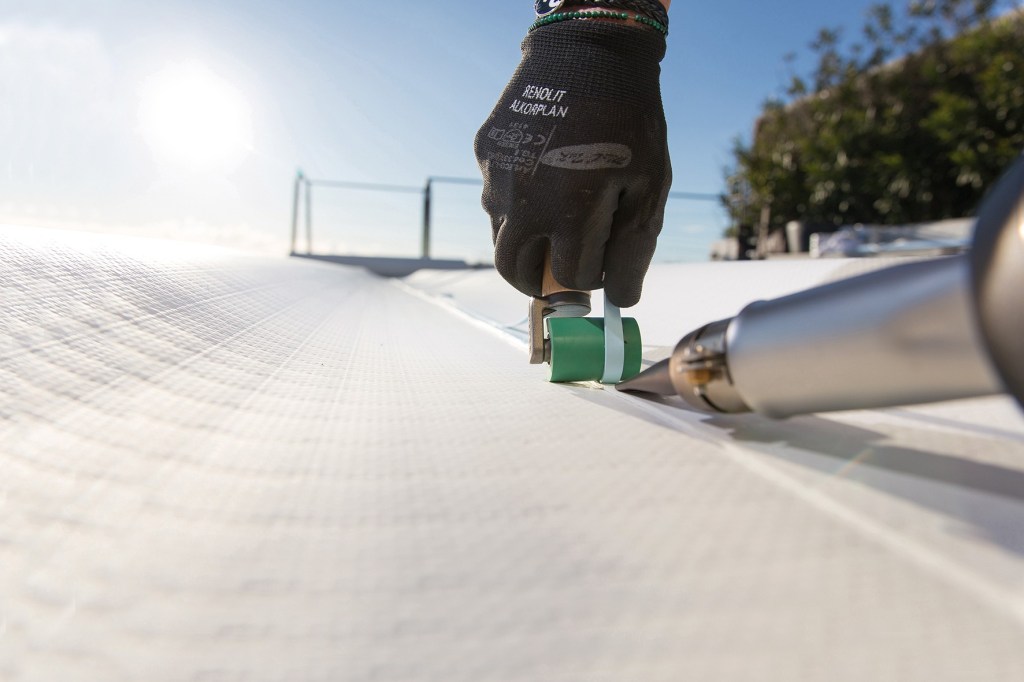
Once the membrane is held in place with the spot welds, installers begin to apply the welding gun down the full length of the seam. Simply insert the welding nozzle under the overlap and heat both surfaces sufficiently to fuse the layers and form a lap.
While the lap is still hot, use a silicone roller and apply sufficient pressure to ensure the two membranes are pressed and fused together. Make sure the weld is continuous, consistent and between 1.5 and 2 inches wide.
Ensure the welding nozzle remains clean throughout the process. Melted PVC and dust can accumulate on the tool, so it is important to remove that debris with a wire brush.
Butt welding: Traditional overlap welding is suitable for pool walls and steps, where the seams are generally concealed from view.
But on the horizontal pool floor, the overlap can be more easily seen. In this area, installers who want a superior-looking finish employ a technique called butt welding. To do this, they butt the membrane edges against one another, rather than overlapped.
When this technique is used, viewers cannot see the joints where the PVC membranes meet on the floor. This particularly makes a difference at night, when the pool water is illuminated by in-pool lighting. In the daytime, when the water is moving, the traditional overlap welding is not apparent. Mastering butt welding on the pool floor is for those installers that want to achieve absolute flatness with virtually invisible joints both by day and by night.
Used in conjunction with a recess cut into the felt underneath, it will give the pool floor a flat finish that also provides a smoother surface to bathers walking on the floor.
This technique is not required by any means. The use of butt welding gives the pool floor an impeccable visual finish. Because it takes more time, it is only recommended for the floor area. Some installers stick with the overlap weld here as well.
For the best butt-welding results, begin by adhering the geotextile membrane to the floor. Then use a weld-backing strip under the two pieces of PVC membrane that will “butt up” to one another. The membranes will weld right in the center of the head welding band, with no space between them. If the process is done properly, there is no need to use liquid PVC on the seam as each membrane will be sealed with the weld-backing strip, which will ensure complete water tightness.