Another reason for heater failure is insufficient gas supply. Service techs can try using three sequential gas pressure tests — static, load and manifold — to correctly identify insufficient gas pressure and its source.
Addressing basics
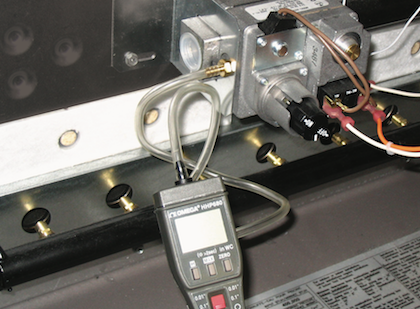
Gas pressure readings are obtained by removing one of the valve’s two 1/8-inch pipe-thread test plugs with an Allen wrench. Then, thread the manometer test fitting and hose into the plug. A test plug is located on the valve’s inlet side, and another on the manifold/outlet side.
Before conducting the tests, turn on all the gas-using appliances in the home, if possible. While you may never run all the gas appliances at the same time, having them on while testing will help verify that the heater won’t be robbed of gas when other “loads” activate during the pool-heating cycle.
Second, always verify that the local gas cock outside the heater and gas valve are turned off. When removing the manometer from the test port, replace the gas valve’s test plug before moving on to the next step.
Test 1: Static pressure
This test measures the baseline pressure of gas at the inlet. The manometer is attached to the inlet side of the gas valve, and the heater should be turned off. Once the manometer is connected, turn on the local gas cock outside the heater. If the static reading is too low based upon the manufacturer’s data plate found inside the heater cabinet, you will need to inspect the following possibilities:
The household gas meter size may be too small. Gas meters are rated in cubic feet per hour (CFH). In general, the meter’s capacity is stamped on the data plate. 1,000 Btu = 1 CFH. Based on this capacity, a 250,000 Btu heater should have a 250 CFH meter. Ideally, your meter should be at least 100 CFHs larger to handle the remaining house supply. If the meter rating is smaller than the heater’s Btu, contact your local gas company to get it upsized or consider downsizing the heater.
The gas line size may be too small. Propane and natural gas have different pipe size requirements. Follow the pipe sizing requirement chart located in the owner’s manual. The pipe diameter is based on the type of gas supply and distance it needs to run. The correct size of pipe should be visible at the main gas supply connection.
There should be a dedicated gas supply line for the heater. The connection point should be a full-service one. The valves in most heaters are 3/4-inch connections.
Once you’re 2- or 3 feet from the heater, there can be a reducer bushing to bring the pipe diameter down to 3/4 inch. If the pipe diameter is incorrect, you can change the heater for a smaller one or run a new gas line.
Assuming the gas meter is the right size and the pipe diameter is correct, there may be a restriction in the gas supply line. Verify that any and all gas supply valves are fully open.
Should you still encounter a supply problem, contact the local gas company. It will be able to handle an obstruction in the gas line or any problems with the gas-line regulator if it is damaged or not properly set.
Test 2: Load pressure
This test measures the inlet gas pressure under load (while the heater and other appliances are operating).
Keep the manometer attached to the inlet of the gas valve. However, this time the heater and all gas appliances should be turned on and operating. Make sure you turn the gas valve inside the heater cabinet to the “on” position.
If the load reading is low, review the steps under the static test. If the heater will not fire, record the manometer reading as it attempts to activate. A drop in static pressure indicates the control loop is closed and the gas valve is open — even if the heater doesn’t fire. Since there is flow, the heater should be shut off immediately. If the reading is acceptable, proceed to the manifold test.
Test 3: Manifold pressure
This test measures the gas pressure going to the burners. With the local gas cock and heater gas valve off, remove the manometer test fitting from the inlet tap and replace the test plug. Attach the manometer to the outlet/ manifold side of the gas valve. Make sure you turn the heater on (local gas cock and heater gas valve), along with all appliances attached to the same gas supply.
The gas valve may need to be adjusted if the reading is low or high. All gas valves have an adjustment screw. To increase, turn it clockwise with the heater running and manometer attached. Turn it 90 degrees and read the manometer until you’ve reached the proper pressure. This adjustment screw should not be tightened or loosened completely (bottomed out). If the heater will not fire, record the manometer reading as it attempts to activate.
If the manifold pressure is correct (per owner’s manual), the heater problem isn’t related to the gas supply. Instead, the problem is in the ignition or combustion system.
Symptoms and Treatments
Symptom: Pool not heating or slow to heat.
Cause: Procedure:
The system is not running long enough Reset the time clock.
A dirty filter is keeping the heater from firing Backwash the filter.
The thermostat is faulty or out of adjustment Test and replace the thermostat as needed.
The pressure switch is inoperative Given a clean filter, test the switch and replace it if necessary.
The heater is too small Consult a heater-sizing chart and upsize the unit.
The gas system is undersized Check gas-pipe sizing charts and upsize the plumbing. Check the meter and the supply shut-off valve for proper sizing as well.
Symptom: Soot has formed in the combustion chamber.
Cause: Procedure:
Excessive water is flowing through the heater Correct water flow and clean the heat exchanger.
The air supply is inadequate Check the installation for proper clearances and/or venting. (On indoor applications, verify the adequacy of the air supply and venting.)
The air inlet or venturi for the burner is plugged Check for debris, dirt, insects or small animals and clean the passage.
The time clock prevents the heater from Adjust the time clock and clean the exchanger.
running long enough to heat the water
The gas valve regulator is out of adjustment. Test for proper gas pressure and adjust the regulator as needed or replace the gas valve.
Symptom: The heater goes on and off repeatedly.
Cause: Procedure:
The filter is dirty Backwash the filter.
The pool’s water level is low Raise the water level.
The manual bypass is out of adjustment Adjust the bypass.
The pressure switch is out of adjustment Adjust the pressure switch and verify that the heater shuts off when the system’s pump shuts off.
Gas volume is low Adjust the gas level/pipe sizing to ensure there is an adequate supply.
Symptom: Scale is forming in the heat exchanger.
Cause: Procedure:
The pool or spa water is excessively hard Bring total alkalinity, pH and calcium hardness within acceptable levels.
The heater is staying on when the water flow Adjust the pressure switch.
has diminished because of debris in the filter
The manual bypass is out of adjustment Adjust or repair the bypass valve.
Symptom: Heat exchanger is corroding/eroded.
Cause: Procedure:
The water chemistry is acidic Balance the water.
Excessive flow Check the bypass valve as well as the pump sizing. You may need to install a manual bypass.
Symptom: A lazy burner flame.
Cause:
Low gas pressure
Procedure:
Check gas pipe and meter sizes and/or adjust gas pressure as needed.
Cause:
Debris, dirt or insects are plugging the burners
Procedure:
Clean the burners.
Symptom: The heater makes knocking or whining noises.
Cause:
The water flow is too low
Procedure:
Adjust or replace the pressure switch.
Remove the blockage and flush the system. (This is rare.)
Descale or replace the heat exchanger.
Adjust the pressure switch.
Adjust water flow to ensure adequate flow.
PSN thanks Raypak Inc. for the technical assistance provided in this troubleshooting chart.